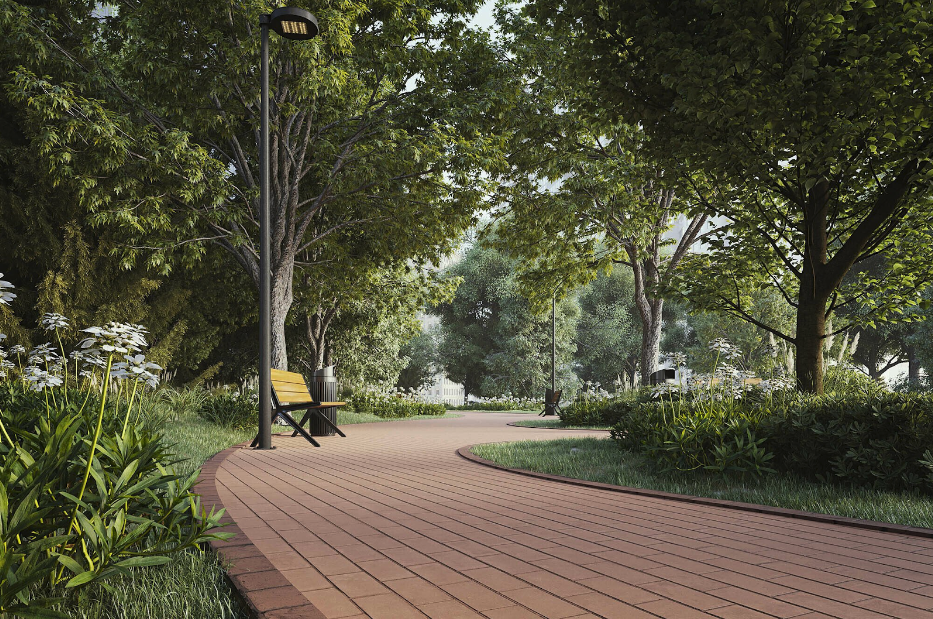
A walkway made of pavers is a beautiful addition to residential and commercial properties alike, offering the beauty of classical aesthetics by way of modern materials and design.
In this article, we’ll take a look at how to properly plan and install a paver walkway, and discuss a fantastic paver option to maximize durability, performance, and aesthetics.
How to Install Paver Walkways: The Planning Phase
To begin paver walkway installation, it’s critical to start with the correct calculations and double check them.
The old adage of “measure twice, cut once” is always true, even for those who are handy and experienced with many projects! Especially with a walkway that covers significant distance, or one that is laid out in a more intricate manner than just a long rectangle, double and even triple checking is always the first step - many DIYers also use a calculator to verify material needs before they start ordering supplies.
Calculate Square Footage
Measure the dimensions of the area to be resurfaced and calculate the total square footage. Be sure to add extra space the measured square footage to ensure you have more pavers on hand in case of future damage.
Calculate Amount of Product Required
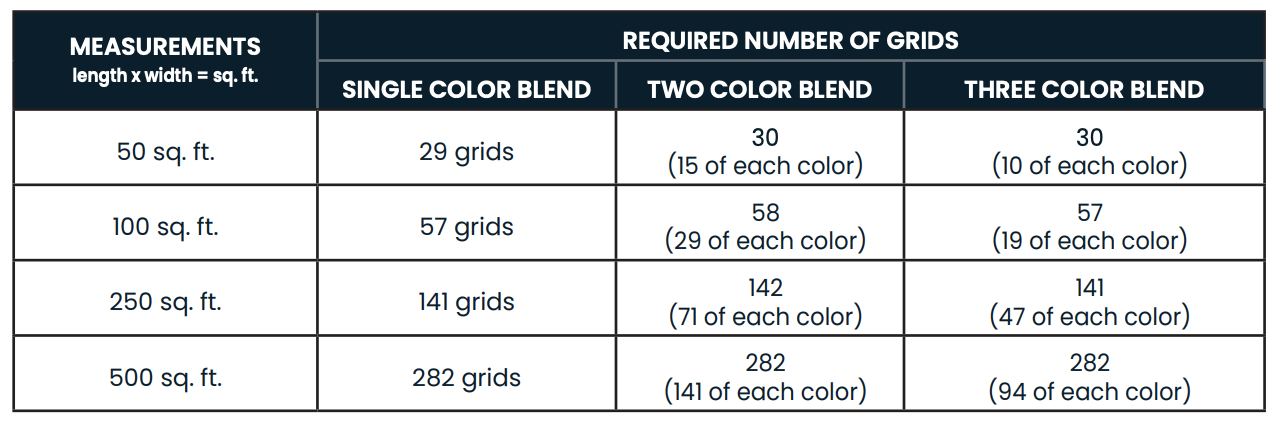
Once the square footage is calculated, the amount of product to fill that area must then be calculated. When using Aspire Pavers a full grid includes a 16.0" x 16.0" grid filled with pavers (1 o 16 pavers depending on their size). Each grid covers 1.78 square feet. To calculate how many grids are needed, divide the total square footage of the project by 1.78.
If wanting to include more than one color, here is a helpful chart to understand how many of each color you might need dependent on the overall square footage:
Choosing a Paver Pattern
While you can certainly stay simple, many opt for a pattern that boosts aesthetics beyond color combinations.
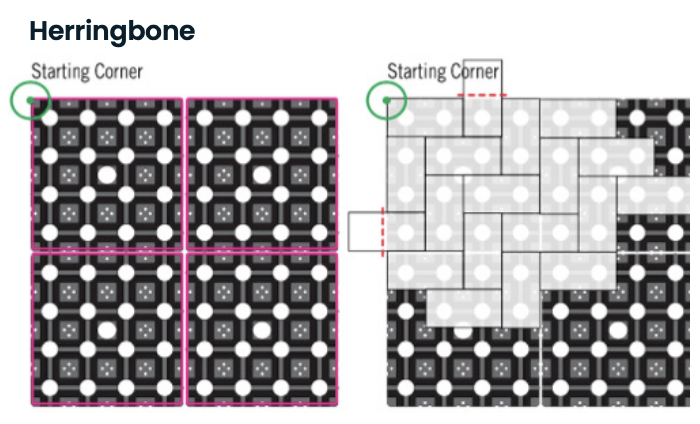
While we are many steps away from actually laying down pavers, it’s important to get an idea of how the patterns are going to be laid for planning purposes. This is especially important as the pavers need to connect two grids in each direction, so you must plan how many grids are needed and how they will interlock.
Let’s take a look at the most common three patterns and how they are oriented.
Herringbone
The most popular and easiest to install pattern, a herringbone pattern will force pavers to interlock grids in both directions, removing the need to specially orient the grids. The below illustration shows the orientation of the installation grids and where and how to begin laying the pavers.
Basketweave
The below pattern is the easiest installation option for a basketweave pattern. The starting paver must be laid 4" down and 4" over from the top left corner of the grid. This will shift the pattern over and assure at least one paver will connect two grids in both directions. The leftover grid can either be trimmed off, or a 4" border can be used to fill in the extra space.

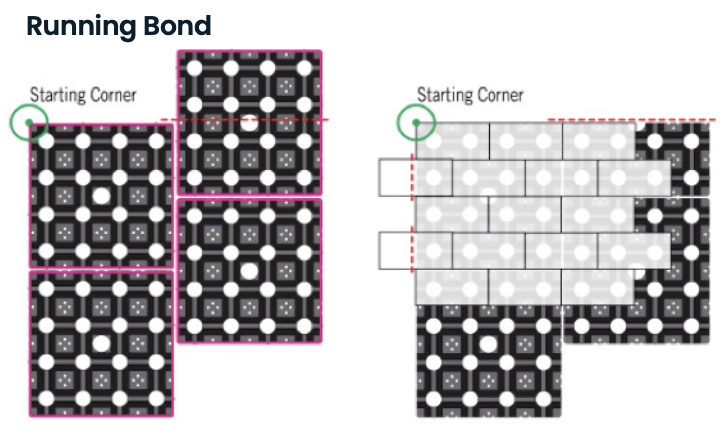
Running Bond
To achieve a running bond pattern, the grids will need to be staggered. The starting paver can be laid in the top left corner, but the next column of grids must be staggered halfway down the starting row. Every other column will need one half grid at the top. Each half of the cut grid can be used.
For more complex patterns involving pavers of differing sizes, such as plain weave, block lattice, and soldiered, see our detailed installation guide.
Required Materials and Tools
Here is a list of the tools and materials necessary to complete a paver walkway install:
Pavers and Paver Grids
Base material (such as gravel or crushed stone)
Sand
Edging material (optional)
Landscape fabric
Wooden stakes
String
Shovel
Rake
Tamper
Level
Rubber mallet
Plate compactor (optional but recommended for larger projects)
Masonry saw (for cutting pavers to fit)
Full Paver Installation Instructions
1. Site Planning and Marking
After deciding on your layout, mark or spray paint the overall outline and plan approximately 12" wider than the planned installation area. This will provide the additional excavation area needed for edging. Any pavers that will run up to structures or other paved areas will not require installed edging and therefore do not require the additional 12" of excavation.
2. Base Material Design
The subgrade is the ground on which base material will be added as the foundation of the paver construct. Some subgrades such as clay and silt, may require additional base material for appropriate strength. You will also need to excavate prior to adding the base material onto the subgrade. Laying geotextile material is an excellent choice to make sure the subgrade and base material do not mix.
3. Excavation
Before adding base material to the subgrade, it’s important that the appropriate depth be available. Likely this will involve some level of excavation. Use this calculation to ensure your depth is appropriate:
Excavation Depth = Base Material Thickness + Sand Bed Thickness + 1.75" (Pavers) – 1 /4"
Once you have calculated the excavation depth, excavate the site and try not to disturb the subgrade beneath the required depth. The subtraction of 1 /4" leaves room for compaction that occurs during the final tamping.
4. Base Material And Sand Bed
Base material should be a dense graded aggregate. Aggregate graded to 3/4" minus is a commonly used base material, often referred to as “Class 5” or “road base.” It is very important to slope the base in the direction that water is preferred to go. The typical slope is approximately 1" over 6'.
A layer of bedding sand is spread out on top of the compacted base material. This layer should be a maximum of 3/4" to 1". This will create a workable surface for the pavers to be installed upon and will make it easier to make the installation even.
5. Install Base Material and Sandbed
Install and Compact Base
Add base material 2" at a time and compact each layer completely with a plate compactor or hand tamper. Be sure to compact all edges and corners thoroughly as these are at the most risk of degradation and limit any undulations to under 1 /4" to limit any dips or humps in the final installation.
Install and Level Sand Bed
Add a 3/4" to 1" layer of bedding sand. To make the sand levels, lay down two parallel pieces of conduit (3/4" or 1" diameter) and place bedding sand between the two pieces of conduit and pull a screed board or straight edge down the conduit. Add sand to areas that are uneven and re-level. Then, pull the conduit out and fill in the area, leveling with a trowel or float. Do not compact the bedding sand.
Decide on Border / Soldier Course
In this step, it’s time to lay out the grids appropriate to your design, whether straight or curved. Utilize accessory pavers to help limit the cutting and give a finished look to the project. Remember that the grids need to be connected by pavers to lock the system in; refer to the above planning instructions if you wish to incorporate a paver pattern.
6. Install Borders And Accessory Pavers
Interior grids can be readily assembled, but the borders will need to be custom fit and cut relative to your design. To do so, follow these steps:
Draw the shape of the desired border onto the pavers that will need to be cut. This is easiest done by laying the accessory pavers on top of the other pavers and tracing the interior edge. A string line may also be used.
Cut the pavers on the line in place using a jigsaw (do not cut through the grid), or using a miter saw.
Place the legless full and/or wedge pavers on top of installation grids to create the border.
Once this is complete, fill the grids in with the pavers per your pattern design and finish the borders with cut pavers or accessory pavers. As mentioned, planning with the help of accessory pavers can save a lot of time and labor.
7. Install Edging
Pavers require the use of an edge restraint around the perimeter. Edge restraints help keep the installation from moving, and perimeter pavers from tipping off the grid. The edging is generally staked down using 10" stakes, one every 6" to 12". Plastic, aluminum, or concrete edging will work. When using Aspire pavers, edge restraints can be installed next to, or on top of, the installation grids. For areas that will eventually be bordered by sod, or that have a curved perimeter, some installers may prefer to install edging over the top of the installation grids. If this is done, drill holes in the grid where the stakes will go.
8. Tamping Pavers and Joint Sand
The final step is to make sure the pavers are secured by adding joint sand. Though this is optional for pedestrian use, we do recommend always using sand for driveways.
Prior to sanding the pavers, use a vibratory plate compactor or a hand tamper to work the pavers into the sand bed. This will typically cause the pavers to sink approximately 1 /4" into the bedding sand and will reduce small undulations.
The same sand used for the sand bed can be used for the joint fill. This is a clean, sharp and well-graded coarse sand. Do not use overly fine sands; coarse sand will perform better.
Start by spreading the sand across the pavers with a shovel.
Allow the sand to dry completely; this will make it easier to get into the joints.
Use a broom to spread the sand across the joints, sweeping in all directions.
Continue to spread and sweep the sand while tamping the pavers. – This can be done with a hand tamper or plate compactor.
When the joints appear to be filled to the desired level, sweep the installation clean of any remaining sand or dust.
The pavers will return to their original color once the pavers have been cleaned by rain.
Additional joint sand applications may be necessary after rain or settling of the joint sand occurs.
Pave Your Walkway the Right Way with Aspire Pavers

Aspire Pavers are a unique system that maximize durability, performance, and aesthetics all in an easy-to-install package. Once complete, you’ll have a beautiful new walkway built to last, and feel great that the materials are created with up to 95% recycled material!
For more information about utilizing Aspire Pavers for your new walkway, contact our experts today.