
Round and semi-circle patios are a great way to introduce curve aesthetics into otherwise squared construction design. The reason for squares in construction are plain: right angles make for strength. That said, right angles as an aesthetic in non-load bearing structures, such as patios, are chosen for ease of installation rather than necessity. A square patio seems much easier to install than a round patio. While true, that doesn’t mean that installing a round patio with pavers is impossible!
In this article, we will discuss how to properly build a round paver patio, introducing a modern paver material that allows for a non-complicated install that achieves durability, performance, and aesthetic desires.
The Planning Phase for a Round Paver Patio
The “hardest” part of constructing a round paver patio is planning for the curves. Unlike a square patio constructed of pavers, a round one will require precise design and cutting of the edges in order to achieve that beautiful curve.
While it may seem challenging to consider cutting all of those pavers appropriately for a great curve, one aspect of the modern paver systems, specifically the Aspire paver system, is the grids in which the pavers sit. By laying out and planning the border grids and then cutting them appropriately, you’ll have a locked-in base from which to install the pavers in a curve.
Paver Walkway Planning Phase
To begin a round paver installation, it’s critical to start with the correct calculations and double check them—especially with the curved edge. “Measure twice, cut once” is one of the most important statements you can remember!
Calculate the Square Footage
Measure the dimensions of the patio area and calculate the total square footage. Be sure to add extra to the measured square footage so you have extra pavers on hand in case of future damage. The classic formula for calculating area of a circle is critical here: A=πr2
Measure the radius of your patio in feet, multiply it by itself, and then multiply by pi to find the total square footage.
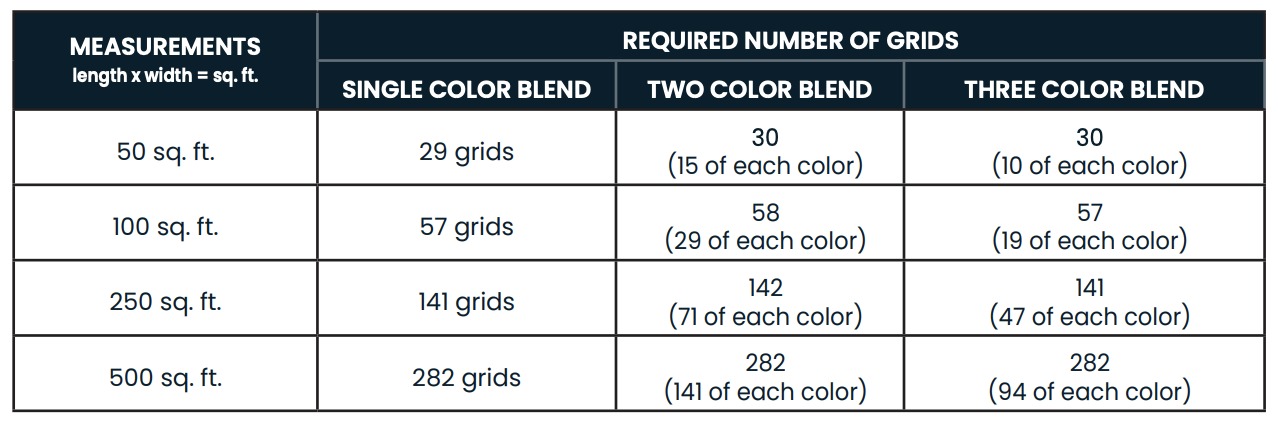
Calculate Amount of Product Required
After calculating the desired square footage of your round paver patio, you will need to determine the amount of product necessary to achieve that calculation.
A full installation grid of Aspire Pavers includes a 16.0" x 16.0" grid filled with pavers with each grid covering 1.78 square feet.
To calculate the number of grids required, divide the total square footage of the project by 1.78.
If you intend to employ multiple paver colors, see the below chart to understand how many pavers of each color you will need:
Choosing a Paver Pattern
One of the great benefits of pavers is the aesthetic diversity available via paver placement. Often we think they are just laid down in courses, but there are many patterns available utilizing the same pavers. This diversity in aesthetic options only compounds when introducing pavers of differing colors.
That said, the more complex the design, the more complex the planning must be before any paver is laid. Especially when designing a round patio, it’s important to get an idea of how the patterns are going to be laid for planning purposes.
The most popular, easy to install paver patterns include:
Herringbone
Basketweave
Running Bond
Plain Weave
Block Lattice
Soliered
To learn how to form these patterns correctly with pavers, as well as appropriately placing them within paver grids, check out this detailed installation guide.
Materials and Tools Required for Round Paver Patio Installation
While you may rely on some tools more than others, this is a complete list of materials and tools we find useful to have on hand in order to complete a round paver patio installation without delays:
Pavers and Paver Grids
Base material (such as gravel or crushed stone)
Sand
Edging material (optional)
Landscape fabric
Wooden stakes
String
Shovel
Rake
Tamper
Level
Rubber mallet
Plate compactor (optional but recommended for larger projects)
Masonry saw (for cutting pavers to fit)
Round Paver Patio Installation Instructions
1. Site Planning and Marking
You will want to begin by marking or spraying paint on the ground for your overall outline. If you plan to incorporate edging, plan approximately 12" wider than the round patio outline. Any pavers that will abut structures or other paved areas will not need installed edging, so marking the extra 12” is unnecessary.
2. Assessing the Base
The ground where you will put the paver structure for your round patio is called the subgrade. Note that some subgrades such as clay and silt may require additional base material for proper strength, so it is helpful to understand what the soil and ground in your planned patio area is composed of. If you do have clay or silt, you may need to excavate a bit deeper to allow for more base material.
3. Excavation
To determine the depth you will need to excavate the subgrade, utilize the following formula.
Excavation Depth = Base Material Thickness + Sand Bed Thickness + 1.75" (Pavers) – 1 /4"
After calculating the excavation depth, begin excavating the site with as minimal disruption to the subgrade as possible. A flat-edged shovel is a good way to maintain relative evenness rather than a pointed shovel. After the pavers are installed, you will be tamping them; this is where the subtraction of 1/4" is important.
4. Adding the Base Material And Sand Bed
The ideal base material is dense graded aggregate. “Class 5” or “road base” is commonly used aggregate graded to 3/4" minus is a commonly used base material. It is critical to slope the base in the direction you want any water that ends up on the finished round patio to flow. Aim for a slope of approximately 1" over 6'.
Install and Compact the Base Material
Add your base material and compact each layer completely with a plate compactor or hand tamper 2" at a time. Ensure that all edges and corners are compacted thoroughly as these are at the most risk of degradation. You will also need to limit any waves in the base material to under 1 /4" to limit any dips or humps.
Install and Level Sand Bed
Once the base material is in place, the addition of bedding sand evens the surface of the base material, allowing for a workable surface for the pavers to be installed upon. Spread a layer of bedding sand upon the base layer 3/4" to 1" deep.
To level the sand, arrange two parallel pieces of conduit (3/4" or 1" diameter) on the edges, fill with sand, and pull a screed board or straight edge down the conduit. Although you are filling a round area, keep the conduit in parallel lines to properly level the sand bed. You can simply sweep away the sand that falls as the edges curve. Unlike the base material, do not tamp the bedding sand once in place.
5. Place Paver Grids and Pavers
Paver Grid Installation
This step is when you lay out the paver grids appropriate to your design. Begin by filling out the circle as much as possible with the grids, then we get to the “hardest” part - placing grids along the edges and marking them appropriate for the cuts necessary to achieve the curve. Trace following the curve of the bedding sand below and cut the grids appropriately. Now it’s time to cut the pavers to match the edge grids, and place them and the interior pavers.
Paver Installation
To properly cut the edge pavers, follow these steps:
Draw the shape of the desired border onto the pavers that will need to be cut. This is easily done by utilizing and laying accessory pavers on top of the other pavers and tracing the interior edge.
Use a jigsaw or miter saw to follow your tracing to cut the pavers to shape.
Once complete, fill the installation grids in with the pavers, following your pattern design and finish the borders with your cut pavers.
6. Edging Installation
It’s beneficial to have an edge restraint around the perimeter to keep everything secure. While the pavers won’t be free to move, having them contained by an edging further ensures the pavers have no chance to migrate. The edging is staked down using 10" stakes, one every 6" to 12". Your edging selection is up to your overall aesthetic; plastic, aluminum, or concrete edging all work great. When utilizing Aspire pavers, edge restraints can be installed next to, or on top of, the installation grids.
7. Tamping Pavers and Joint Sand
Once the pavers have been properly placed, the final step is to verify that they are secured in their grids. Before sanding the pavers, use a vibratory plate compactor or a hand tamper to work the pavers and grid complex into the sand bed. This is where that extra ¼” of excavation will show its usefulness as the pavers will sink to this depth from the tamping, further reducing any small undulations.
Once the pavers are tamped, it’s time to add sand for the joints between the pavers using the same sand used for the bedding. This coarse sand will surprisingly work much better than overly fine sands.
Begin by spreading the sand across the pavers with a shovel, allowing the sand to dry completely so that it will more easily find its way into the joints. Using a broom, spread the sand across the joints, sweeping in all directions. As you spread and sweet the sand, lightly tamp the pavers with a hand tamper. Once the joints appear to be appropriately filled, sweep the pavers clean of any remaining sand. At this point you may feel like the paver colors have been negatively impacted by the addition of the joint sand, but they will return to their original color once the pavers have been cleaned by rain. If you find that after a rain the joint sand seems insufficient, additional applications can be performed to perfect the paver joints and overall surface.
Build a Fantastic Round Paver Patio with Aspire Pavers
In addition to the easy-to-install grid system, Aspire pavers, made up of 95% recycled material, are extremely durable to ensure a long-lasting round paver patio. With a variety of colors and pattern options, not only can you achieve a round paver patio, but it can be done with impressive aesthetic sensibilities. Contact our experts today to get started on the planning phase of your round paver patio.