A floating deck is one of the easiest and most stylish ways to upgrade your outdoor space. Unlike traditional decks, floating decks don’t require deep footings or attachment to your home. Instead, they rest on the ground, making them a simple yet effective DIY project for homeowners.
If you’ve been wondering how to build a floating deck, this guide will walk you through the entire installation process, from choosing the perfect location to installing the decking materials. From a cozy backyard retreat to a stylish floating patio deck, this project offers a budget-friendly, rewarding way to upgrade any outdoor space—no matter the size.
Why Build a Floating Deck?
Before diving into the steps, let’s talk about why a DIY floating deck is a fantastic choice for your outdoor space. Here are the primary benefits of a floating deck:
Easy Installation: One of the biggest and best advantages of a floating deck is easier installation. There’s no need for deep concrete footings or complex framing, making it much simpler than a traditional deck.
Affordability: Cost-effectiveness is another major benefit since floating decks require fewer materials and less labor, making them a budget-friendly option.
Versatility: You can build floating decks over grass, gravel, or even an existing patio.
Low Maintenance: Maintenance is also minimal, especially when you use durable materials like Aspire Pavers, which are designed to stand up well against the elements without fading or cracking.
How to Build a Floating Deck

Here’s a step-by-step process on how to build a floating deck in your backyard space.
Step 1: Choose the Right Location
Your first step in floating deck construction is selecting the right spot. Ideally, you want an area that’s level and easily accessible. Consider factors like sun and shade, depending on whether you want a sunny lounging space or a shaded retreat.
Drainage is also super important, so avoid spots where water tends to pool after rain, as that can lead to long-term issues. Beyond that, you should always think about accessibility so that your backyard floating deck connects well to your home, garden, or patio. And finally, check local building regulations or HOA rules before starting so you can ensure that your project meets any necessary guidelines.
Step 2: Prepare the Ground
Once you’ve chosen the perfect location, it’s time to prepare the ground to create a stable base for your deck. Start by clearing the area and removing any grass, weeds, and needless debris that could interfere with the foundation. Then, level the ground using a shovel and rake, smoothing out any uneven spots. To prevent unwanted growth beneath your floating deck DIY project, lay down a weed barrier before proceeding.
Step 3: Lay the Foundation

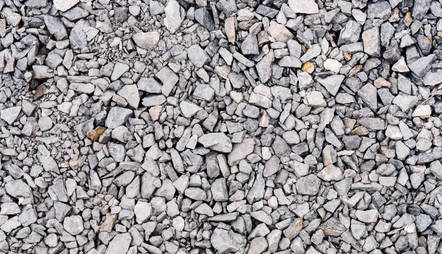
A solid foundation is crucial for floating deck construction, but fortunately, with Aspire Pavers, you don’t need anything super complicated. The most common foundation options include deck blocks, which are precast concrete blocks that provide stable support for the frame.
Step 4: Assemble the Frame
For a more traditional setup, you need to build the frame of your DIY floating deck. Start by cutting and laying out the frame using pressure-treated lumber or composite materials. Once the pieces are in place, connect the frame securely with galvanized screws or metal brackets, ensuring durability.
After assembling the structure, check to make sure everything’s level before moving forward, as an uneven frame can cause long-term stability issues. If you’re using Aspire Pavers, this step is even easier!
Step 5: Install the Decking Surface

With the frame in place, the next step is installing the decking surface. You have several material options depending on your desired look and maintenance preferences. Wood decking offers a classic and natural aesthetic but requires sealing and routine maintenance to prevent warping. Composite decking is a more durable alternative, but it can be expensive.
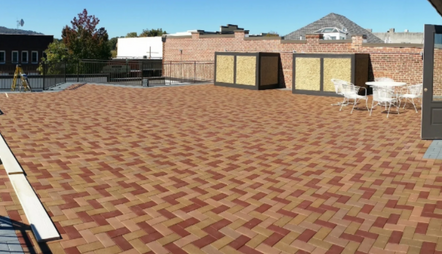
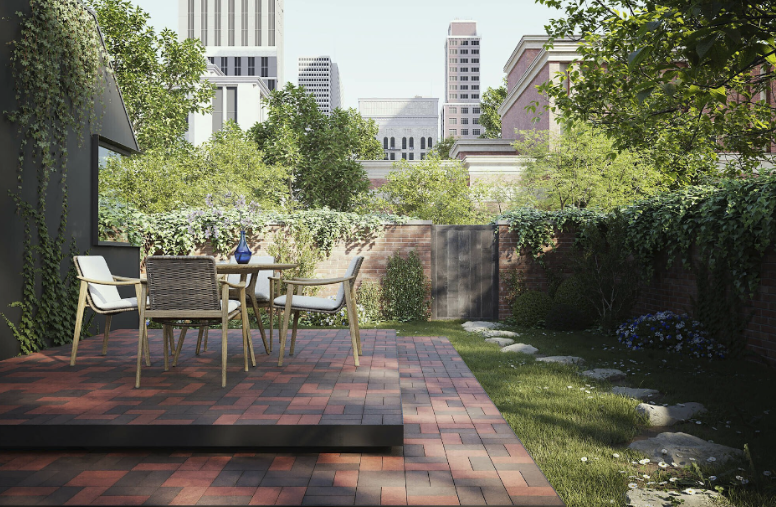
For a lightweight, weather-resistant, and long-lasting solution, Aspire Pavers is the perfect choice. Our pavers snap together over a grid, eliminating the need for nails, screws, or complicated measurements. Plus, they’re resistant to cracking, fading, and warping, making them ideal for a floating deck backyard upgrade that requires minimal upkeep.
Step 6: Add Finishing Touches
Once you have the deck fully built, it’s time to focus on the little details. Edging and skirting enhance the deck’s overall look by concealing its base, creating a clean, cohesive, and professionally finished appearance. Then, it’s time to add fun stuff, like weatherproof outdoor furniture, string lights, solar lanterns, umbrellas, fire pits, and more!
With these final touches, your floating deck DIY project will be complete, providing you with a stylish, low-maintenance outdoor space perfect for relaxing and entertaining.
Working with a flat roof and limited outdoor space? Learn more about how to create a floating deck over a flat roof!
Start Your Floating Deck Project Today

Installing a floating deck in your backyard is a simple way to completely transform your outdoor space without the hassle of traditional deck construction. By following the steps outlined above, you can easily build a floating deck that’s both functional and beautiful. For the best results, you should use Aspire Pavers for a lightweight, low-maintenance solution for long-lasting decks, patios, and outdoor spaces.